Pages

Wednesday, September 14, 2016

Cauliflower Tikka Masala

I wish I could say that I have some logic or method for selecting recipes to try. But I don't, and I even boggle myself on why I decide to try something. Vegetarian Gastronomy's Cauliflower Tikka Masala recipe is one of those instances.

I like chicken tikka masala but have never been inspired to make it, even after I finally added a number of spices to my pantry that are used in Indian cooking. But for some reason, I saw the cauliflower version through PureWow's turmeric guide and got inspired. I think I was drawn to another way to cook cauliflower, the recipe looked very doable, and I already have most of the ingredients.

When I'm inspired to make a dish, I usually do a web search to compare recipes and try to find more authentic recipes. Not this time. So, I realized after I was in the middle of making this that it is actually a vegan recipe that uses coconut milk instead of heavy cream. Not a bad thing and I was pretty pleased with how it tasted.

One hesitation I had about this vegan recipe was that it includes red bell pepper, which I didn't see as a common ingredient in non-vegan tikka masala recipes. So I'm not sure what was behind using red bell pepper...texture, flavor, personal taste? Reason for my hesitation is because I dislike bell peppers, especially the green ones. I don't like their flavor and I think their taste lingers well after a meal. But, I don't avoid eating a dish that has them and will eat around the peppers if I have to. And if I actually eat them, I'd rather eat red or orange ones that are roasted or cooked down because they are slightly sweeter. I'm very happy to say that the bell pepper flavor was mild in this dish. Maybe because it was blended up.


I passed on the optional cashew cream. And I don't have mustard seeds and left that out because I hate buying spices for one dish. I also don't think it's necessary to grate the ginger since it goes into the blender anyway, so I just minced it to save time and have one less tool to wash. 
Blended sauce returned to pan with spices added

Cauliflower added in

I served this with yummy jasmine rice to mix with all that good sauce. Finishing the dish with fresh cilantro really finishes the dish. Overall, I liked this dish quite a bit and would make it again. It can be a main dish or a side. I'd probably try it with cream and leave out the bell pepper to see how the flavor of the dish changes.
Cauliflower tikka masala served over jasmine rice

My Rating (out of 5): 4

Wednesday, September 7, 2016

Cha Cha Matcha Review

Even though green tea became more known and popular in the U.S. a few years ago, it seems that matcha-centric cafes have been popping up recently. Or was I just oblivious in the past? I've been a long time fan of green tea/matcha since childhood so I was excited to find out about a matcha shop.

Cha Cha Matcha is a new matcha shop at the border of Nolita and Little Italy. I was nearby for an errand and took the opportunity to check the place out. There are a number of things about this new shop that charmed me.

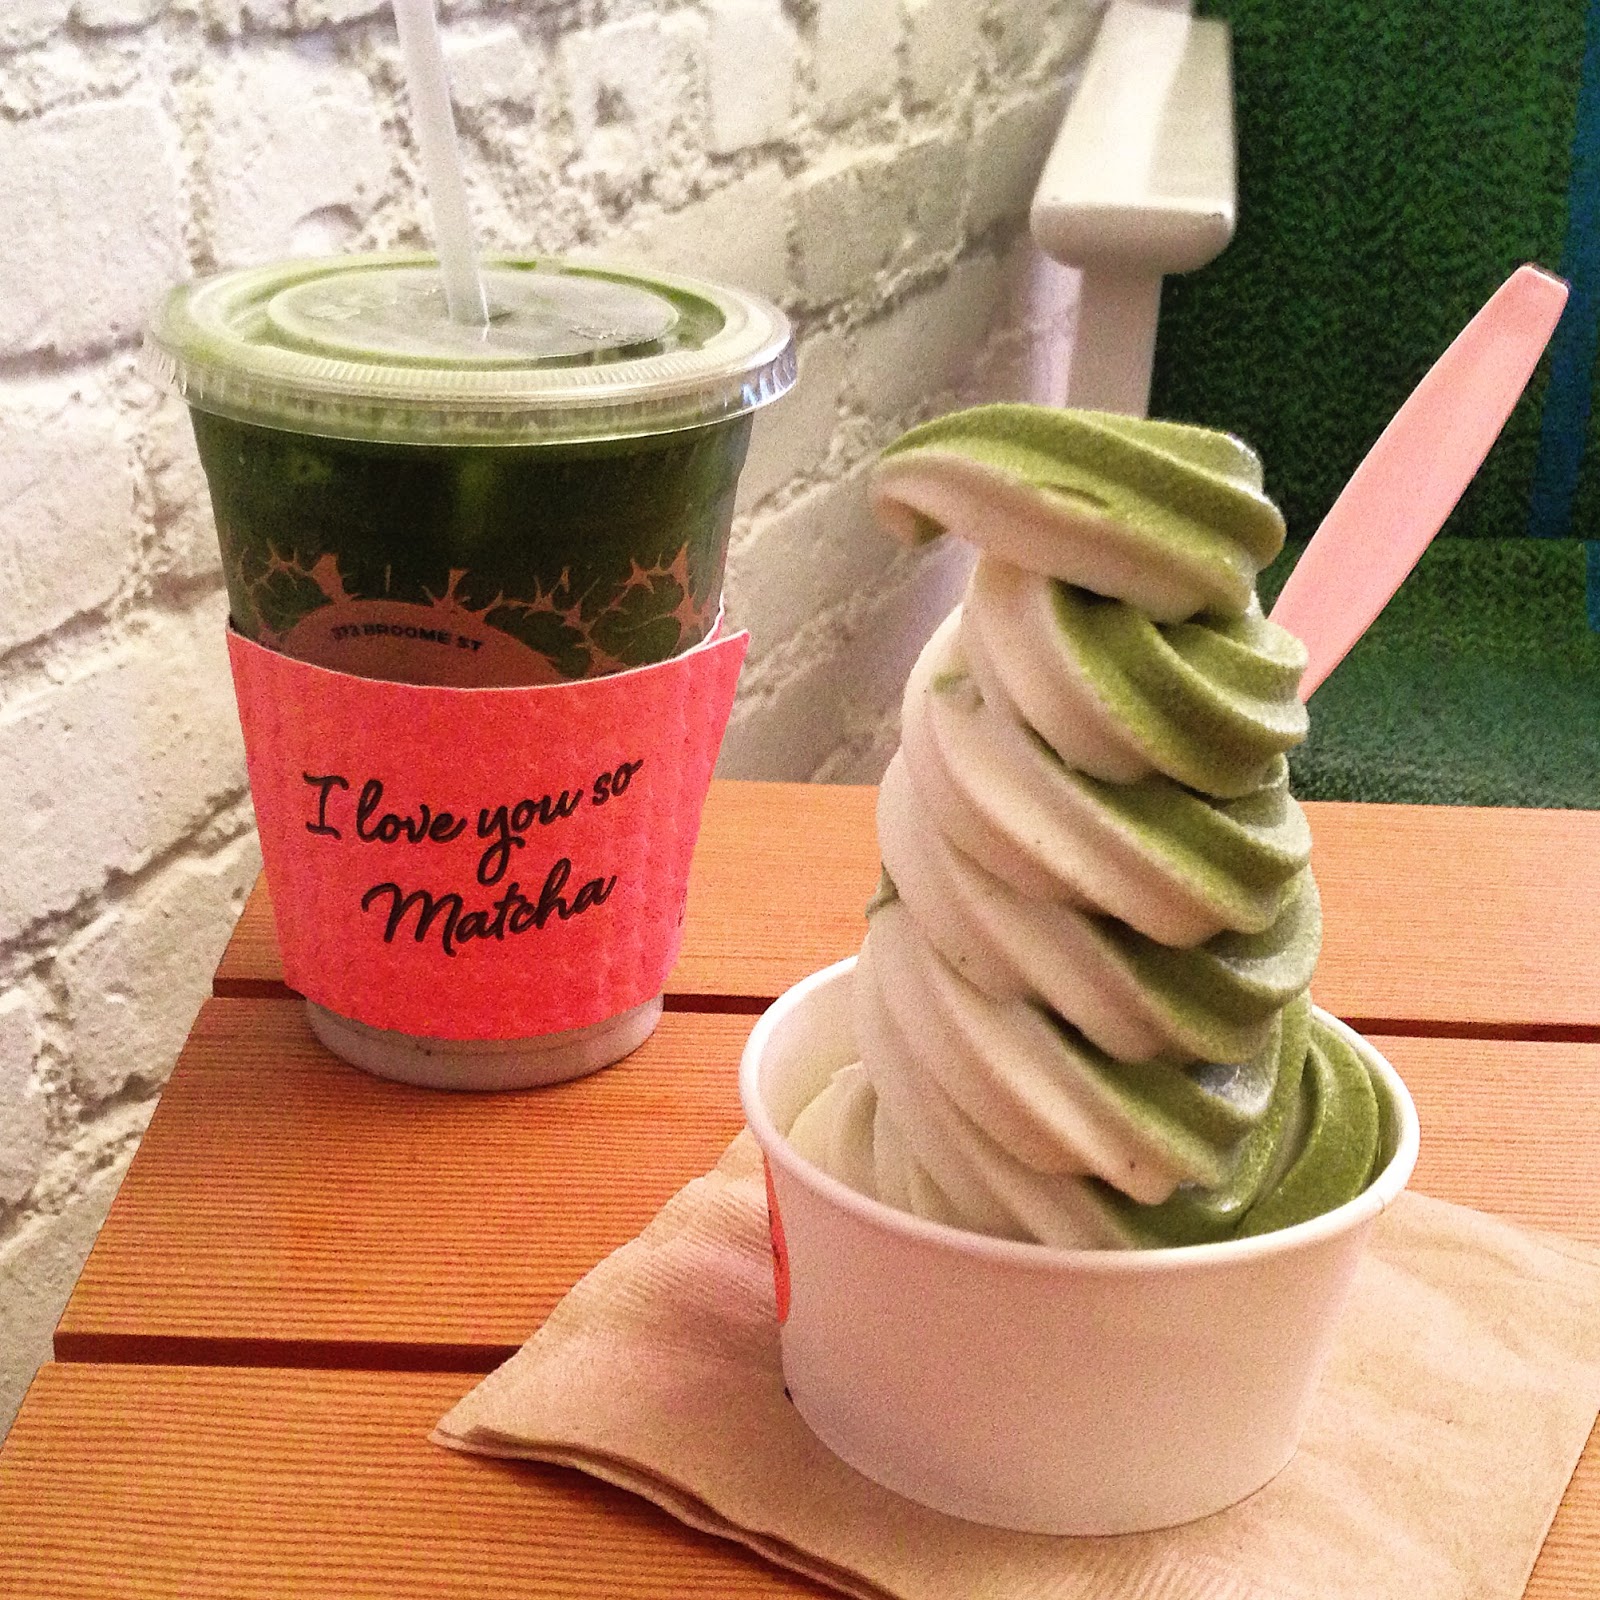
They offer hot and cold matcha drinks (not just lattes) and matcha pastries. But they also have matcha & vanilla soft serve ice cream and matcha & yuzu lemonade slushies! I definitely had a hard time deciding what to try, but I settled on an iced coconut matcha latte and a soft serve swirl.

The latte wasn't bad. Neither the matcha nor coconut flavors were overwhelming. Unlike a matcha latte at Starbucks, I liked that this wasn't sweet so you can control how much sweetener to add. At $5, I didn't find it overpriced in this day and age, even in NYC, for a 16 oz. cup. They didn't charge more for ordering it iced which I've seen some coffee shops do.

The matcha vanilla swirl was definitely my favorite of the two. I mean, it's ice cream. The vanilla was just a tad too sweet for my preference but the matcha flavor was just right. The matcha ice cream was smooth with good green tea flavor without any bitterness. I couldn't resist the swirl because it looks pretty, but I'd just get matcha ice cream next time. It's a really good sized serving at $4, especially with artisan ice cream shops charging more for a small single scoop.

Their name is fun. Their website says the name is derived from the Japanese word for tea, ocha. But I love their play on words to create a bright, fun tropical design concept as a nod to the cha cha dance's origin.

They go the extra effort to have custom cups and cup sleeves with their logo and design. I think this is a nice touch of detail that adds to the fun vibe. The "I love you so matcha" cup sleeve is just cute.

There are a good number of tables and seating inside. Plenty of outdoor bench seating with an expandable awning for sun shade.

Plus, they have a punch card to get a free drink after purchasing 9 drinks. Even the card design is cute!

They only accept credit cards and use Square's payment processing. If you have an email on file with Square and get digital receipts, Cha Cha Matcha's receipts also award stars for each visit and offers 50% off your next purchase after 5 purchases. So this is another bonus on top of the frequent buyer punch card.

I'd definitely go back when I'm in the area to try other items. And if they decide to open up another shop or two, I wouldn't mind as long as they can keep their local, neighborhood feel.

11.1.2016 UPDATE: I've been back to Cha Cha Matcha a few more times and still enjoying the vibe and products. While match soft serve is always available, they have been changing up the second flavor on offer. Pink lemonade was available this summer and fit perfectly with their color theme (check out my Instagram post), and they recently replaced it with coconut soft serve.

My Rating (out of 5):  4

Cha Cha Matcha
373 Broome St.
New York, NY 10013
chachamatcha.com

Monday, August 29, 2016

Golden Milk (Haldi Doodh) Recipe

I bought a few 3 oz. packages of spices, like turmeric, over in Curry Hill to try a (surprise) curry recipe. I don't use these spices often, so I have a lot left over. When I came across an email today with different ways to use turmeric, I was inspired to try a number of recipes.

I was introduced to golden milk (or haldi doodh), which is a warm turmeric milk drink. Turmeric has anti-inflammatory, anti-oxidant, and immune-boosting properties, among other benefits. So this drink is an easy way to take advantage of its health benefits. I also read that taking black pepper with turmeric increases absorption of turmeric in our bodies by 2000%.

I looked online for more information on how it's made and used this recipe to make my first cup. I really liked how it tasted with the warming spiciness of the turmeric and pepper. Turmeric is part of the ginger family and has a similar spiciness as ginger. Golden milk makes for a nice drink to have before bed. Note, I was cautious with my first cup and used a small amount of pepper. (Update: I made this again with a 1/2 teaspoon of black pepper that I saw in another recipe and thought it was too much so I'd stick with 1/4 teaspoon.)

I will definitely try different variations with other types of milk (coconut, almond), ginger, fresh turmeric vs. ground, and more pepper. But this is the recipe I used for my first try.

Golden Milk Recipe

Time: 2-3 minutes
Yield: 1 cup (8 oz.)

Ingredients
  • 1 cup milk (any fat content of your choice)
  • 3/4 teaspoon ground turmeric powder
  • 1/4 teaspoon ground black pepper
  • 1 teaspoon honey
  • 1 teaspoon coconut oil

Directions
Stir all ingredients in a pot over medium heat. Bring to a simmer and continue to simmer for 1-2 minutes. Keep an eye on it so it doesn't boil over. Pour into a mug and enjoy!

Optional: Some of the ground spices settle to the bottom of the mug, which I didn't mind. If you prefer, you can strain the mixture through a very fine sieve.

Saturday, August 20, 2016

Urbanspace Vanderbilt Review

Finally paid a visit to Urbanspace's indoor spot. The "food hall" term is a current food trend and, frankly, I roll my eyes because most self-proclaimed food halls are just food courts. I like food courts, so just call it what it really is.

So, I was very pleased to step inside Urbanspace Vanderbilt and actually feel like I was in a food hall. I didn't exactly have in mind what a food hall should look like, but I knew this is how a food hall should feel once I walked around this place.

(In contrast, on the way to Urbanspace Vanderbilt, I saw the new Great Northern Food Hall by chef Claus Meyer in Grand Central and was disappointed in its appearance. It looked like food kiosks or counters that I can find at airports and didn't conjure the feel of a food hall to me.)

The layout and design at Urbanspace Vanderbilt really make the vibe. There's open space between many vendors as opposed to partitions or walls separating each vendor at a typical food court. Even with the industrial decor, the string lights help bring warmth to the space. I just like how it all comes together. Sorry that I don't have any pictures of the space to share...my phone battery was dying.

There are plenty of great vendors to choose from like Roberta's, Sigmund's Pretzels, and OddFellows Ice Cream. And some food concepts will rotate giving more reason to return. On this first visit, I went with a small Famous Original pizza from Roberta's. Great thin, crispy crust but be prepared to wait 10-15 minutes because they make pizzas to order.


It's a great way to try a bunch of vendors in one place and it's year-round. Only wish it was conveniently located for me.

My Rating (out of 5):  4

Urbanspace Vanderbilt
Entrances at 45th St. & Vanderbilt Ave.
230 Park Ave. (at The Helmsley Building)
New York, NY 10169
http://urbanspacenyc.com/urbanspace-vanderbilt/

Sunday, July 31, 2016

Off the Eaten Trail: Kocostar Foot Therapy Review

WARNING: This post contains photos of peeling feet that you may find gross and wish to avoid.

I was late to the game on foot peels and wish I had heard of them sooner. With all the walking in NYC, my feet are cracked and rough unlike when I lived in suburbs. I've tried foot lotions that are intended for cracked, dry feet and filing rough skin. But they never really worked and thick, rough skin remained.

Kokostar Foot Therapy
So when I heard about foot peels, specifically Baby Foot, I was willing to try it. Unfortunately, the Ricky's location that I went to was out of Baby Foot. But a salesgirl suggested Foot Therapy by Kocostar and swore that it works just as well and only costs $9.50. (Baby Foot is around $25.)  I was skeptical that it could work as well given the significant price difference, but I was willing to try Foot Therapy just to see how a foot peel would work.

I also did some online research about foot peels and found Refinery29's tips to be very helpful. I soaked my feet once or twice after the peel, but not every day.

I did my foot peel in April this year. I highly recommend doing a foot peel as the weather starts to get warmer and a couple of weeks before you plan to wear shoes that expose your feet. Your entire foot will peel up to the ankle and it can be unappealing and embarrassing.

It didn't take very long after using Foot Therapy for my feet to get a good peel going by the fourth day. Nothing much happened for the first few days and I didn't soak my feet. But when I walked around the city in sneakers and socks, I was surprised at how much my feet had peeled when I took off my socks at home. I think the moisture and sweat really helped things get going.

From there, I soaked my feet a couple of times which helped along the peeling as well. What impressed me about the foot peel is how effective it is in shedding any hard, calloused skin around my heels and balls of my feet. Once the dead skin had shed, those areas felt soft and were not calloused or cracked anymore. It's amazing and Foot Therapy worked really well for me.

My feet stayed soft and smooth for a short while before I started to notice any roughness starting to occur. I wasn't surprised by this since it's just the normal process of what happens when walking around the city. But because foot peels are chemical peels, it's not something that should be used frequently. I think waiting at least 2-3 months between treatments is a good idea. (Note, I am not a doctor and this is just my opinion.)

Here are pictures of my experience. My feet weren't in as bad a shape as I saw in some other people's pictures. Personally, I don't think the pictures are that bad. The pictures are a teeny gross and unsightly, but they didn't make me feel sick or need to look away.

Bottom of my feet before I applied Foot Therapy:

Bottom of my feet right after soaking in Foot Therapy booties (not much noticeable change):

Once the peeling really began:

Flaking around the ankle

I want to try some other peels on Refinery29's "Best Foot Peels For Under $20" to see how effective they are, such as TONYMOLY Super Peeling Liquid. But I would use Foot Therapy again with no hesitation.

Bottom Line: Highly recommend

Friday, July 29, 2016

Off the Eaten Trail: Makeup Primer Substitute

Ok, so I'm veering off food posts with this one. I'm always interested in alternatives or substitutes for pricey products like makeup. But there are a lot of cheap or hokey suggestions out there and it's hard to know what really works.

One day, I saw a makeup artist's tip from a lifestyle talk show on using chafing gel as makeup primer because they have the same main ingredients. So I was very intrigued about using chafing gel as a low-cost primer substitute. I use Smashbox Photo Finish Foundation Primer but I don't use it everyday because I don't like a lot of steps in my makeup routine and it's expensive at $36 for 1 oz. (at time of this post). I love the silky and smooth feel of the primer, and I could see how it would work for chafing. But I would never waste expensive primer on my body! 

I haven't used chafing gel and a Google search primarily turned up two products. Other anti-chafing or anti-friction sticks and powders show up but aren't going to work as primer.

1. Lanacane Anti-Friction Gel, 1 oz. - may also be labeled as "Anti-Chafing Gel"; price range $5-8. Ingredients from Lanacane's Anti-Friction FAQ page: cyclopentasiloxane, dimethicone crosspolymer, dimethicone / vinyl dimethicone crosspolymer, zea mays (corn) starch.

2. MONISTAT COMPLETE CARE® Chafing Relief Powder Gel®, 1.5 oz. - price range $5-7. I didn't find ingredients easily on Monistat's site so here are the ingredients listed on Target.com:
Active Ingredient: Dimethicone (1.2%)
Inactive Ingredients: Cyclopentasiloxane, Dimethicone/Vinyl Dimethicone Crosspolymer, Silica, Tocopheryl Acetate, Trisiloxane.

Now, the Smashbox primer ingredients are: 
CYCLOPENTASILOXANE , DIMETHICONE , DIMETHICONE CROSSPOLYMER , TRISILOXANE , SILICA , DIMETHICONE/VINYL DIMETHICONE CROSSPOLYMER , ETHYLHEXYL SALICYLATE , RETINYL PALMITATE , TOCOPHERYL ACETATE , CARTHAMUS TINCTORIUS (SAFFLOWER) SEED EXTRACT , PROPYLENE GLYCOL , WATER\AQUA\EAU , VITIS VINIFERA (GRAPE) SEED EXTRACT , COLA ACUMINATA (KOLA) SEED EXTRACT , CAMELLIA OLEIFERA LEAF EXTRACT

After comparing the products, I'm actually inclined to try chafing gel as low-cost primer substitute. The Smashbox ingredients listed first are identical to the chafing gels. Both products are used on the skin, and at $5-8, I would have no problems using chafing gel for actual chafing. 

Now, the Smashbox primer does have other ingredients like a number of plant extracts, but they are listed at the end and I doubt the amounts are significant to justify a price that is 450% or more than chafing gel.

Once I've tried this substitute, I plan to update this post.

Tuesday, July 26, 2016

Almond and Sweet Cherry Galette

With cherries in season, I got inspired to make some kind of cherry galette or crostata. I sought out my copy of The Smitten Kitchen Cookbook and lucked out that it had an Almond and Sweet Cherry Galette recipe.

Of course, Deb's recipe involves making pie dough. I have little experience making pie dough and it was not successful. Many years ago, I tried to make a pandowdy with homemade pie dough and the fruit mixture turned out too watery and the pie dough wasn't great. I haven't tried making desserts involving pie dough since.

So, I considered cheating and buying pre-made pie dough to eliminate any anxiety of messing up the dough, and ultimately the galette. But the home cook in me decided to suck it up and make the pie dough.

Despite my inexperience, one thing I always hear about pie dough is to use cold butter and ice water. So I was nervous about my dough getting warm and used refrigerated water from my Brita pitcher, added ice, and let it sit in the fridge to get ice cold right until I had to use it. I even chilled a glass mixing bowl in the freezer beforehand to keep the dough as cold as possible while I formed the dough after the food processor. (Sorry, no pictures to share of making the dough as I moved quickly to get it into the fridge to chill.)

In the end, I was so happy with how the dough turned out! The dough browned nicely and had a flaky texture that I liked. I think some pie crusts can become gummy but this was not. I would definitely use Deb's pie dough recipe again.

Once I got past the pie dough, the rest of the galette recipe is very easy. Prepping the cherries just involved washing and removing stems. The cookbook mentions that some people believe that leaving the cherry pits in imparts an almond-like flavor. So I chose to follow the recipe and leave in the pits because it made prep easier. I actually think there was a slight almond taste from the pits, so I didn't mind it.

The almond filling is quick to make. So simple there's not much to say about it.
Almond mixture, finely ground before wet ingredients added

I kept the rough edges when I rolled out my pie dough and like the rustic look. But you could trim off any rough edges to make perfect round shape or fold edges under for cleaner lines. I didn’t have turbinado/raw sugar and just used granulated white sugar to sprinkle around the edges.

I enjoyed how cherry and almond flavors went together. The pie dough had a nice crispy crust on the bottom and top edges and was flaky. The cherries did not release much juice which I think helped keep the crust from becoming gummy. Another great Smitten Kitchen dessert that isn't too sweet.

I really like a galette because it’s fairly easy and looks impressive.

My Rating (out of 5): 5 for the pie dough; 4 for the galette

Wednesday, July 6, 2016

Luke's Tail Cart


I'm loving the little Tail Cart by Luke's Lobster in Battery Park next to the Seaglass Carousel. Grilled lobster tail skewers are a perfect bite for hanging out by the water. It's my new favorite food on a stick.
Two regular tail skewers (and a shadow claw)

Luke's Lobster launched Luke's Tail Cart earlier this summer selling grilled lobster tails, which is not on the menu at their regular shacks. (If you still haven't heard of Luke's Lobster, check out more about them and their sustainable practices. I've been a fan of their simple, delicious lobster rolls since they opened their first shack in NYC's East Village.)

The Tail Cart menu is short and simple...grilled lobster tail skewers, free sauces, and a couple of desserts for your sweet tooth. They offer regular size skewers (1 for $6/2 for $11) and large size skewers (1 for $10/2 for $19). Each skewer is half a lobster tail, which makes it easier to eat from the shell. There's even an infographic on how to eat your tails.
Dipped in Maine blueberry balsamic sauce

Both of my regular skewers were perfectly cooked through but still tender. I tried both the lemon butter and Maine blueberry balsamic sauces. While lemon butter is classic, I highly recommend the blueberry balsamic sauce. It was delicious.

Grab some tails and enjoy views of the Statue of Liberty or the park's gardens.
Lady Liberty looking further away that it did in real life

My Rating (out of 5): 4

11.11.2016 Update: The Tail Cart has moved locations a few times since I visited and is changing what they are offering, perhaps for seasonality or limitations on how food can be prepared at the location. After Battery Park, the cart went to the new Whole Foods in Williamsburg, Brooklyn and is now moved to the Whole Foods in Tribeca. So check out their site to find out the cart's latest location and menu.

Saturday, May 21, 2016

Cauliflower Tots Recipe

Remember when no-carb diets like Atkins and South Beach were "in" several years ago and cauliflower mash was all the buzz as a mashed potato substitute? Well, these days with vegan, gluten-free, and grain-free diets, I see cauliflower getting renewed attention as a substitute for pizza crust and rice. And Trader Joe's has gotten in on the trend by selling packaged cauliflower "rice" (frozen and fresh).

I picked up a 1 lb. bag of fresh cauliflower "rice" because I wanted to try it but wasn't sure how. Of course, making my own cauliflower rice would be less expensive. But I like the idea of buying a pre-chopped bag because I think the cuts would be more even, and I didn't want to risk some of the cauliflower turning into paste or puree at the bottom the food processor.

A few days later, a recipe for cauliflower "tater" tots came across my email, and I serendipitously had all the ingredients at home already. This recipe is baked, not fried. Nor is it grain-free or vegan. I made some modifications to accommodate what I had on hand.

The tots bake with a nice outer crisp but the inside is soft with the cauliflower giving a little bite just like a tater tot. I love having fun with food and this would be great for parties.

Cauliflower Tots Recipe

Time: 10-15 minutes prep; 55 minutes cook
Yield: Makes about 52 tots (about 6 servings as an appetizer or side)

Ingredients
  • 3 cups cauliflower rice, uncooked
  • 1 tablespoon extra virgin olive oil
  • Kosher salt and ground black pepper
  • Nonstick spray
  • 1 bunch of scallions, minced
  • 2 tablespoons flat leaf parsley, finely chopped
  • ½ cup shredded cheddar cheese
  • ½ cup grated Parmigiano Reggiano
  • 1 teaspoon garlic powder
  • ½ teaspoon cayenne pepper
  • 1 large egg, lightly whisked
  • 1 large egg white, lightly whisked
  • ¾ cup panko bread crumbs
In this photo, I'm using a jalapeño instead of ground cayenne pepper.
And the parm cheese is not pictured.

Directions
Preheat the oven to 400°F.

In a nonstick skillet, heat the olive oil over medium-high hat. Sauté the cauliflower rice for 2 to 3 minutes, and season with kosher salt and black pepper. Most of the cooked cauliflower should have lost its opaque white color but not mushy. And the salt helps pull out some of the moisture. Remove from heat and let cool. Once cooled, press the prepared cauliflower rice with paper towels or a clean kitchen towel to absorb excess moisture. Transfer to a large bowl.

Line a baking sheet with parchment paper and spray it generously with nonstick spray. The spray and contact with the baking sheet is what gives the tots color. If you don't have nonstick spray, use a vegetable oil to coat the parchment paper.

Add the scallions, parsley, cheese, garlic powder, cayenne, egg and egg white; mix to combine.

Add the panko bread crumbs and mix to combine. Season with salt and black pepper. If the mixture does not bind well when forming the tots, add more bread crumbs as necessary. I needed more bread crumbs and eyeballed about 1 tablespoon more.

Scoop 2 teaspoons of the mixture and form it into a cylindrical shape. (If you want larger tots, 1 tablespoon works but I wouldn't go any larger than that. And of course, you'll end up with a fewer number of tots.) To shape the tots, I found that making a fist around the mixture helped the mixture stick together. I pressed the ends to flatten them out. Then, I lightly rolled the tot in my palm to smooth any bumps. Keeping my hands wet with water kept the mixture from sticking to my hands. I rewet my hands every 3-4 tots. This was the most time consuming part of the recipe. (I wonder how the mixture would work pressed through a large round piping tip into long strands that can be cut in to tot size.)

Place on the prepared baking sheet. Repeat until all the mixture has been used. Spray the surface of the tots with nonstick spray or brush with a vegetable oil.

Bake for 17 to 20 minutes until they’re golden brown on the bottom. Flip the tots and bake 10 to 15 minutes more to get the other side all golden. Serve warm, with your favorite dipping sauce. Ketchup really adds to the tater tot taste and an aioli makes it gourmet for a party.

Cooking notes: When I first made these, I had half of a jalapeño pepper left over from another dish, so I used that instead of cayenne so it didn't go to waste. I deseeded and deveined the jalapeño and finely chopped it. The tots were not spicy from this amount of jalapeño, so using cayenne pepper adds more heat. I also only had 1/2 cup of cheddar cheese and used 1/4 cup of Parmigiano Reggiano to make up for missing cheese. So you can adjust the amount of cheese to your liking and use other cheeses.

If you want the color of the tots to be less green, you can use less scallions. There were 10 scallions in the bunch I used, so you can really see them throughout. As the tots bake, they flatten a bit on the baking sheet but the shape holds up for the most part.

I love how these turned out and couldn't stop eating them because they are bite size!

Saturday, December 26, 2015

Mashed Potatoes with Kale

I know some people have kale fatigue and are sick of hearing about it, but I still enjoy it. So I was very intrigued when I found this Mashed Potato with Kale recipe from Giada De Laurentiis.

I made this dish for the first time for Christmas yesterday and it smells and tastes great! Don't let the kale fool you...I wouldn't call this a healthy dish with all the mascarpone, Parmesan, and butter.

Mascarpone cheese, Parmigiano Reggiano, kale, onions, garlic, unsalted butter

I didn't have enough butter for all of my dishes so I left the butter out when boiling the potatoes (just added butter in the assembly steps). I only had regular chicken stock instead of low-sodium chicken broth, so I cut back the Parmesan to 1/2 c., salt to 1 tsp and black pepper to 1/2 tsp in the assembly steps so the dish wasn't too salty. And it just seems like a lot of salt in the recipe to me, so it's always easier to add salt than take out.

Sweating onions & garlic
Adding cooked kale to mashed potatoes  

The result was creamy mashed potatoes with a twist of texture from the kale. I thought it was still very flavorful even though I cut back on some of the salty ingredients. This recipe makes a LOT and I think you can get more like 8 servings out of it. I took some of the leftovers and divided into big scoops of individual servings, then froze them on a sheet pan lined with parchment paper. Once frozen, I placed them all into a freezer bag. Updated note: I reheated the servings I wanted in a microwave straight from the freezer and thought they were still pretty good for frozen food.


My Rating (out of 5): 5

Thursday, December 10, 2015

Orecchiette with Sausage and Kale Recipe

I was craving this pasta dish after seeing a version of it on TV and searched the web for comparable recipes. There weren't as many recipes that turned up to my surprise and none that really grabbed my interest. I found a similar recipe by Michael Symon and made a couple of changes to make the following version. I really enjoyed how the lemon zest and juice added another dimension of flavor. And the butter gives the dish some silkiness.


Orecchiette with Sausage and Kale

Ingredients
  • 2 tablespoons of kosher salt, plus more for seasoning
  • 1 Lb orecchiette pasta, preferably DeCecco
  • 2 tablespoons extra virgin olive oil, separated
  • 1 Lb sweet Italian sausage, casings removed
  • 1/4 teaspoon crushed red pepper flakes (if you like more heat, use 1/2 teaspoon)
  • 10 - 16 oz Tuscan kale, washed & chopped with stems (1" wide)
  • 2 cups pasta water, separated
  • 1 tablespoon Lemon zest
  • 2 tablespoons Lemon juice
  • 1/2 cup grated Parmigiano Reggiano cheese
  • 2 tablespoons unsalted butter
  • 1 tablespoon extra virgin olive oil
  • 1 tablespoon Italian parsley, finely chopped

Directions

Bring 5 quarts of water to a boil with 3 tablespoons of kosher salt. Cook the pasta until very al dente, about 8 minutes (or 1 minute less than the package instructions for al dente). Stir occasionally to make sure the orecchiette doesn't stick together. Remove the pasta to a bowl with a slotted spoon and set it aside. Do not rinse the pasta. Reserve 3 cups of pasta water before discarding.

Heat 1 tablespoon of olive oil in a large Dutch oven or saute pan over medium high heat. Add the sausage, breaking it into pieces with a wooden spoon, and brown until pink is gone, about 5-6 minutes. Add the kale and red pepper flakes and cook down for 2 minutes.

Add 1 cup of the reserved pasta water and simmer for 1 minute. Add the cooked pasta and simmer until pasta is done, about 2 more minutes.

Remove the pan from the heat and stir in the lemon juice and zest, cheese, butter, and 1 tablespoon extra virgin olive oil. Taste and season with additional salt if needed. Plate and sprinkle the parsley on top, then serve.

If you have leftovers, refrigerate the remaining 2 cups of reserved pasta water to use to reheat leftovers the next day. Sprinkle some of the pasta water when reheating, but don't poor too much or the pasta will get soggy. You likely won't use all of the pasta water.

I like to buy pre-chopped kale and Trader Joe's comes in 10 oz. bags. If you buy whole kale leaves in bunches, 3/4 to 1 lb. is fine. You can also use curly kale if Tuscan kale isn't available.

I like to be able to control the spice level so I use sweet Italian sausage and red pepper flakes. However, you could substitute with hot Italian sausage and leave out the red pepper flakes.