Pages

Sunday, November 6, 2016

Sausage, Kale, and Lentil Soup

I came across this soup recipe by Rachel Ray a few years ago and I've been making it on a regular basis since. It's hearty, delicious, and has nutritious ingredients like kale and lentils. It's great for bringing to work for lunch, filling as a meal on its own, and comforting in chilly weather.
Sausage, kale, and lentil soup with sweet potato

Each time I make this, I make some tweaks if an ingredient is not available at the grocery store. I've used sweet Italian sausage and added crushed red pepper flakes if hot Italian sausage was out at the store. If I can't find Fresno peppers, I'll use a different red chili pepper that is available or crushed red pepper flakes. I've used curly kale if Tuscan kale was not available.
Sweet Italian sausage

I've always made this with a Russet potato. But since it's fall, I decided to change it up a bit and used sweet potato instead which has more nutritious benefits. So the pictures I've shared here will have sweet potato in them. 


I often buy pre-chopped packages of kale, which probably has more in quantity than a bunch of kale does. I use the entire bag in the soup. Pre-chopped bags usually have the stem intact, and I don't bother to remove them for this recipe since it's time consuming. And this is a soup, so the stems get soft while it cooks. But if I buy a bunch of kale, I'll remove the stems in those instances.

Tomato paste and white wine really add flavor to the soup so I would not suggest omitting or substituting these ingredients.

The one difference from the recipe that I make is the amount of lentils. I use 1 to 1-1/4 cups of lentils instead of 1-3/4 cups that the recipe lists. I think that amount of uncooked lentils would soak up too much liquid and I wonder if it is typo in the published recipe.
I like to use red lentils

This is a chunky soup. So I like to reserve 1 cup of chicken stock and wait to add it in the last 5 minutes that the soup simmers. This way the soup has some liquid in case it reduced too much while it simmered.

Leftovers are just as delicious and I never get tired of eating this soup!

My Rating (out of 5): 4.5


Friday, November 4, 2016

Concord Grape Muffins

Having tasted my first Concord grape in it's original form, I was so excited to make something with them. Although a web search for recipes turned out lackluster, I did find a muffin recipe from the In Jennie's Kitchen blog that was unfussy and simple enough.

I decided to prep the Concord grapes and dry ingredients the night before. Halving and deseeding 2 cups of grapes took me more than 15 minutes since I've never worked with Concords before. It's a tedious process. To use the grapes whole, you have to remove the seeds but I was a little bummed that some of their yummy juice gets lost in the process. The seeds are set in the flesh of the grape and I couldn't just flick them out with the tip of a paring knife. I found that tracing around the seeds with the knife tip removed the seeds while keeping the flesh somewhat intact. A sharp paring knife helps with cutting out the seed. And because the skins slip off easily, I had quite a few that separated from the flesh while trying to deseed them. I ended up eating those but had to deseed more grapes to replace them. In the future, I wouldn't worry about the skins coming off since they are going into a muffin batter.
One cup halved & deseeded, one to go

This morning, I combined the dry ingredients that I measured last night and mixed in the butter using my fingers. (I don't have a pastry cutter/blender.) I incorporated the whole milk using a wooden spoon as specified in the recipe. The batter at this point was thick.
 

The recipe specifically called for using a wooden spoon to mix in the milk, but I'm not really sure why it had to be a wooden spoon. After the milk, you fold in the Concord grapes. Because the skins come off easily and I didn't want to smash the grapes, I didn't find a wooden spoon as the best option. So I used a silicone spatula to fold in the grapes. And that left another utensil to clean up, so I'd pass on the wooden spoon altogether and just use a spatula.

I used an ice cream scoop to evenly distribute the batter into my silicone baking cups as best as possible. I sprinkled the tops with turbinado/raw sugar and would use more next time because I want the tops to have more crunch.

It took a little more time than the recipe states for my muffins to bake until a toothpick came out clean, about 22 minutes total.

The texture of the muffin was more on the gluey side as I ate the muffins and I would have liked it to be more crumbly. But the amount of Concord grapes in this recipe ensures you get that grape flavor in every bite. These are lightly sweet, which I like, but a little more sugar in the batter would be okay if you prefer more sweetness. Be prepared for your mouth and fingers to turn purple! 

Overall, I like baking with whole Concord grapes but may try a cake or different muffin batter recipe next time. 

My Rating (out of 5):
 3.5

Wednesday, November 2, 2016

Firsts: Concord Grapes

Today, I tasted my first Concord grape in its natural form! And it tastes just like the ubiquitous grape-y flavor found in so many purple grape-flavored products (juice, jelly, candy, cough syrup, etc.). The flavor is not as concentrated in a fresh grape as those products, but it is very recognizable. I knew Concord grapes are used in products like Welch's or Kedem grape juices, but never had a fresh Concord grape. So to taste that flavor from the natural source is exciting.

The grapes are marble-sized and have a thicker skin than typical red and green varieties often sold in stores. The skin slips off easily and the meat/flesh of the grape has a jelly-like texture. It reminds me of eating muscadines. Concords do have seeds so be careful not to chomp down on them (bitter, blech).

Because Concords are not available year-round, I never paid attention to when they're in season or shopped for them before...until this past May when I tried a cake recipe from The Smitten Kitchen Cookbook that included a Concord grape coulis. I looked up seasonal availability and quickly learned they weren't available until fall. (Don't worry, I still made the cake and used blueberries that were in abundance.) Since then, I put Concord grapes on my mental food watch list to try when they came into season.

A couple of weeks ago, I spotted some at the Union Square Greenmarket but they were pricey. I searched for them at a few grocery stores that I regularly visit but had no luck finding them. So when I saw them again at Union Square, I sucked it up and grabbed a basket so I didn't miss out on the season. $8 for a quart (no idea how much it weighs). Boy do their sweet juices bring all the bees to the stand. I tapped my basket to try to rid any bees hiding in the grapes. Luckily, none flew out on the way home and fingers crossed I don't find one buried in there later.

I want to try a new recipe but had zero ideas of what to make with Concords. Unfortunately, not many recipes came up in my search that appealed to me. Plenty of jam recipes came up on Google but I'm just not into canning. Another popular recipe is Smitten Kitchen's Grape Focaccia with Rosemary or similar variations of it. I'd love to try it but just not feeling up to making my own bread. 

Well, I decided to try a muffin recipe from In Jennie's Kitchen blog. See more on that here.


Wednesday, October 26, 2016

Apple Pie Zoats Recipe


I didn't peel the zucchini this time and I could see bits of skin in the dish, which was okay with me. But I think leaving the skin on kept some of the shredded bits from softening as much as skinless shreds did. It still cooked down, but I think I like the texture better when it's peeled. I also left the skin on the apple and didn't notice it in the dish. I didn't use egg whites but added chia seeds for a little extra protein.

Apple Pie Zoats Recipe

Prep time: 5 mins
Cook time: 10-15 mins
Total time: 15-20 mins
Yield: 2 servings

Ingredients
  • 1/2 cup uncooked old-fashioned oats
  • 1/2 zucchini, peeled and grated 
  • 1/2 gala apple (or any sweet red apple), grated
  • 1-1/2 cups water
  • 1/8 teaspoon kosher salt
  • 1/2 teaspoon ground cinnamon
  • 1/8 teaspoon ground nutmeg
  • 1/8 teaspoon ground cloves
  • 1/2 Tablespoon chia seeds
  • 1/2 cup milk (or plant-based milk)
  • Sugar or sugar substitute (I used Splenda)
  • 1/2 gala apple, diced 
  • 1/4 cup sliced almonds
Directions
Add oats, grated zucchini, grated apple, water, salt, cinnamon, cloves, nutmeg, and Chia seeds to a medium saucepan. Stir and bring to a boil. Then lower heat and simmer for 10-15 minutes, stirring every few minutes, or until oats and zucchini are cooked through. Remove from heat and let sit for a couple of minutes.

Stir in milk to thin the zoats to your desired consistency. Adjust sweetness to your taste with sugar or sugar substitute.  Serve immediately in bowls and top with diced apples and sliced almonds.

Thursday, October 20, 2016

Zoats: What the Heck Is That?

I came across an Instagram post of oatmeal and noticed the hashtag "zoats." I was curious and thought it might be some product brand the Instagrammer used. But, I learned from a quick Google search that zoats are oatmeal with zucchini (or zucchini oats). My initial reaction was "ugh, not another frivolous trend." I'm all for culinary innovation but the current food culture is overloaded with people trying to come up with pointless hacks or portmanteaus just for the sake of wow factor and social media likes.

I once saw an Instagram video in which someone used a pin to score small cuts through an unpeeled banana only to peel it and use their other hand to break off pieces at the scored marks and eat them. Not only was this so-called hack useless and unhelpful, but your hand gets dirty. No thanks, I'll just take bites of a banana like a normal person and keep my hands clean. But I digress...

So, why should anyone eat zoats? Can't we just eat them separately? Luckily, I didn't have to look too hard because Google turned up a few articles that quickly explained some benefits. Zucchini are low-calorie and packed with fiber and potassium (more than a banana). And mixing it with oatmeal helps provide fiber while reducing some calories and carbs.

Ok, that gives me enough of a reason to try zoats. A basic zoats recipe has oats, grated zucchini, and egg whites. But if I was going to try this latest food trend, I wanted to go with a fun-flavored version. After getting inspiration from some recipes, I made this carrot cake inspired version (which excludes eggs).

I had to buy zucchini but the rest of the ingredients were based on what I already had in my kitchen. There are plenty of options to use different milks or sweeteners.

The zoats turned out pretty good and it's key to grate the zucchini so it blends into the oatmeal. The texture was very similar to regular oatmeal. A single serving from a 1/2 cup of uncooked oats is doubled by adding the zucchini, so I can see how this helps cut down calories and carbs for breakfast.

While I think this food trend has some benefits and I'd try them again, I don't see it becoming a regular part of my breakfast repertoire. Grating the zucchini adds extra steps and clean up which is not ideal when you're trying to get out the door in the mornings. Zoats are better as a make ahead dish either the night before or on the weekend.

Carrot Cake Zoats Recipe

Prep time: 5 mins
Cook time: 10-15 mins
Total time: 15-20 mins
Yield: 2 servings

Ingredients
  • ½ cup uncooked old-fashioned oats
  • ½ zucchini, peeled and grated (peeling prevents any green tint in the dish)
  • ½ carrot, peeled and grated
  • 1 cup water
  • 1/8 teaspoon kosher salt
  • ½ teaspoon ground cinnamon
  • pinch of ground cloves
  • pinch of ground nutmeg
  • 2 Tablespoons maple syrup
  • 1 teaspoon vanilla extract
  • 1/2 cup milk (or plant-based milk)
  • Sugar or sugar substitute (I used Splenda)
  • 1/4 cup chopped pecans
Directions
Add oats, grated zucchini, grated carrot, water, salt, cinnamon, cloves, nutmeg, maple syrup, and vanilla extract to a medium saucepan. Stir and bring to a boil. Then lower heat and simmer for 10-15 minutes until oats and vegetables are cooked through. Remove from heat and let sit for a couple of minutes.

Stir in milk to thin the zoats to your desired consistency. Adjust sweetness to your taste with sugar or sugar substitute, or additional maple syrup.  Serve immediately in bowls and top with chopped pecans.

Wednesday, September 14, 2016

Cauliflower Tikka Masala

I wish I could say that I have some logic or method for selecting recipes to try. But I don't, and I even boggle myself on why I decide to try something. Vegetarian Gastronomy's Cauliflower Tikka Masala recipe is one of those instances.

I like chicken tikka masala but have never been inspired to make it, even after I finally added a number of spices to my pantry that are used in Indian cooking. But for some reason, I saw the cauliflower version through PureWow's turmeric guide and got inspired. I think I was drawn to another way to cook cauliflower, the recipe looked very doable, and I already have most of the ingredients.

When I'm inspired to make a dish, I usually do a web search to compare recipes and try to find more authentic recipes. Not this time. So, I realized after I was in the middle of making this that it is actually a vegan recipe that uses coconut milk instead of heavy cream. Not a bad thing and I was pretty pleased with how it tasted.

One hesitation I had about this vegan recipe was that it includes red bell pepper, which I didn't see as a common ingredient in non-vegan tikka masala recipes. So I'm not sure what was behind using red bell pepper...texture, flavor, personal taste? Reason for my hesitation is because I dislike bell peppers, especially the green ones. I don't like their flavor and I think their taste lingers well after a meal. But, I don't avoid eating a dish that has them and will eat around the peppers if I have to. And if I actually eat them, I'd rather eat red or orange ones that are roasted or cooked down because they are slightly sweeter. I'm very happy to say that the bell pepper flavor was mild in this dish. Maybe because it was blended up.


I passed on the optional cashew cream. And I don't have mustard seeds and left that out because I hate buying spices for one dish. I also don't think it's necessary to grate the ginger since it goes into the blender anyway, so I just minced it to save time and have one less tool to wash. 
Blended sauce returned to pan with spices added

Cauliflower added in

I served this with yummy jasmine rice to mix with all that good sauce. Finishing the dish with fresh cilantro really finishes the dish. Overall, I liked this dish quite a bit and would make it again. It can be a main dish or a side. I'd probably try it with cream and leave out the bell pepper to see how the flavor of the dish changes.
Cauliflower tikka masala served over jasmine rice

My Rating (out of 5): 4

Wednesday, September 7, 2016

Cha Cha Matcha Review

Even though green tea became more known and popular in the U.S. a few years ago, it seems that matcha-centric cafes have been popping up recently. Or was I just oblivious in the past? I've been a long time fan of green tea/matcha since childhood so I was excited to find out about a matcha shop.

Cha Cha Matcha is a new matcha shop at the border of Nolita and Little Italy. I was nearby for an errand and took the opportunity to check the place out. There are a number of things about this new shop that charmed me.

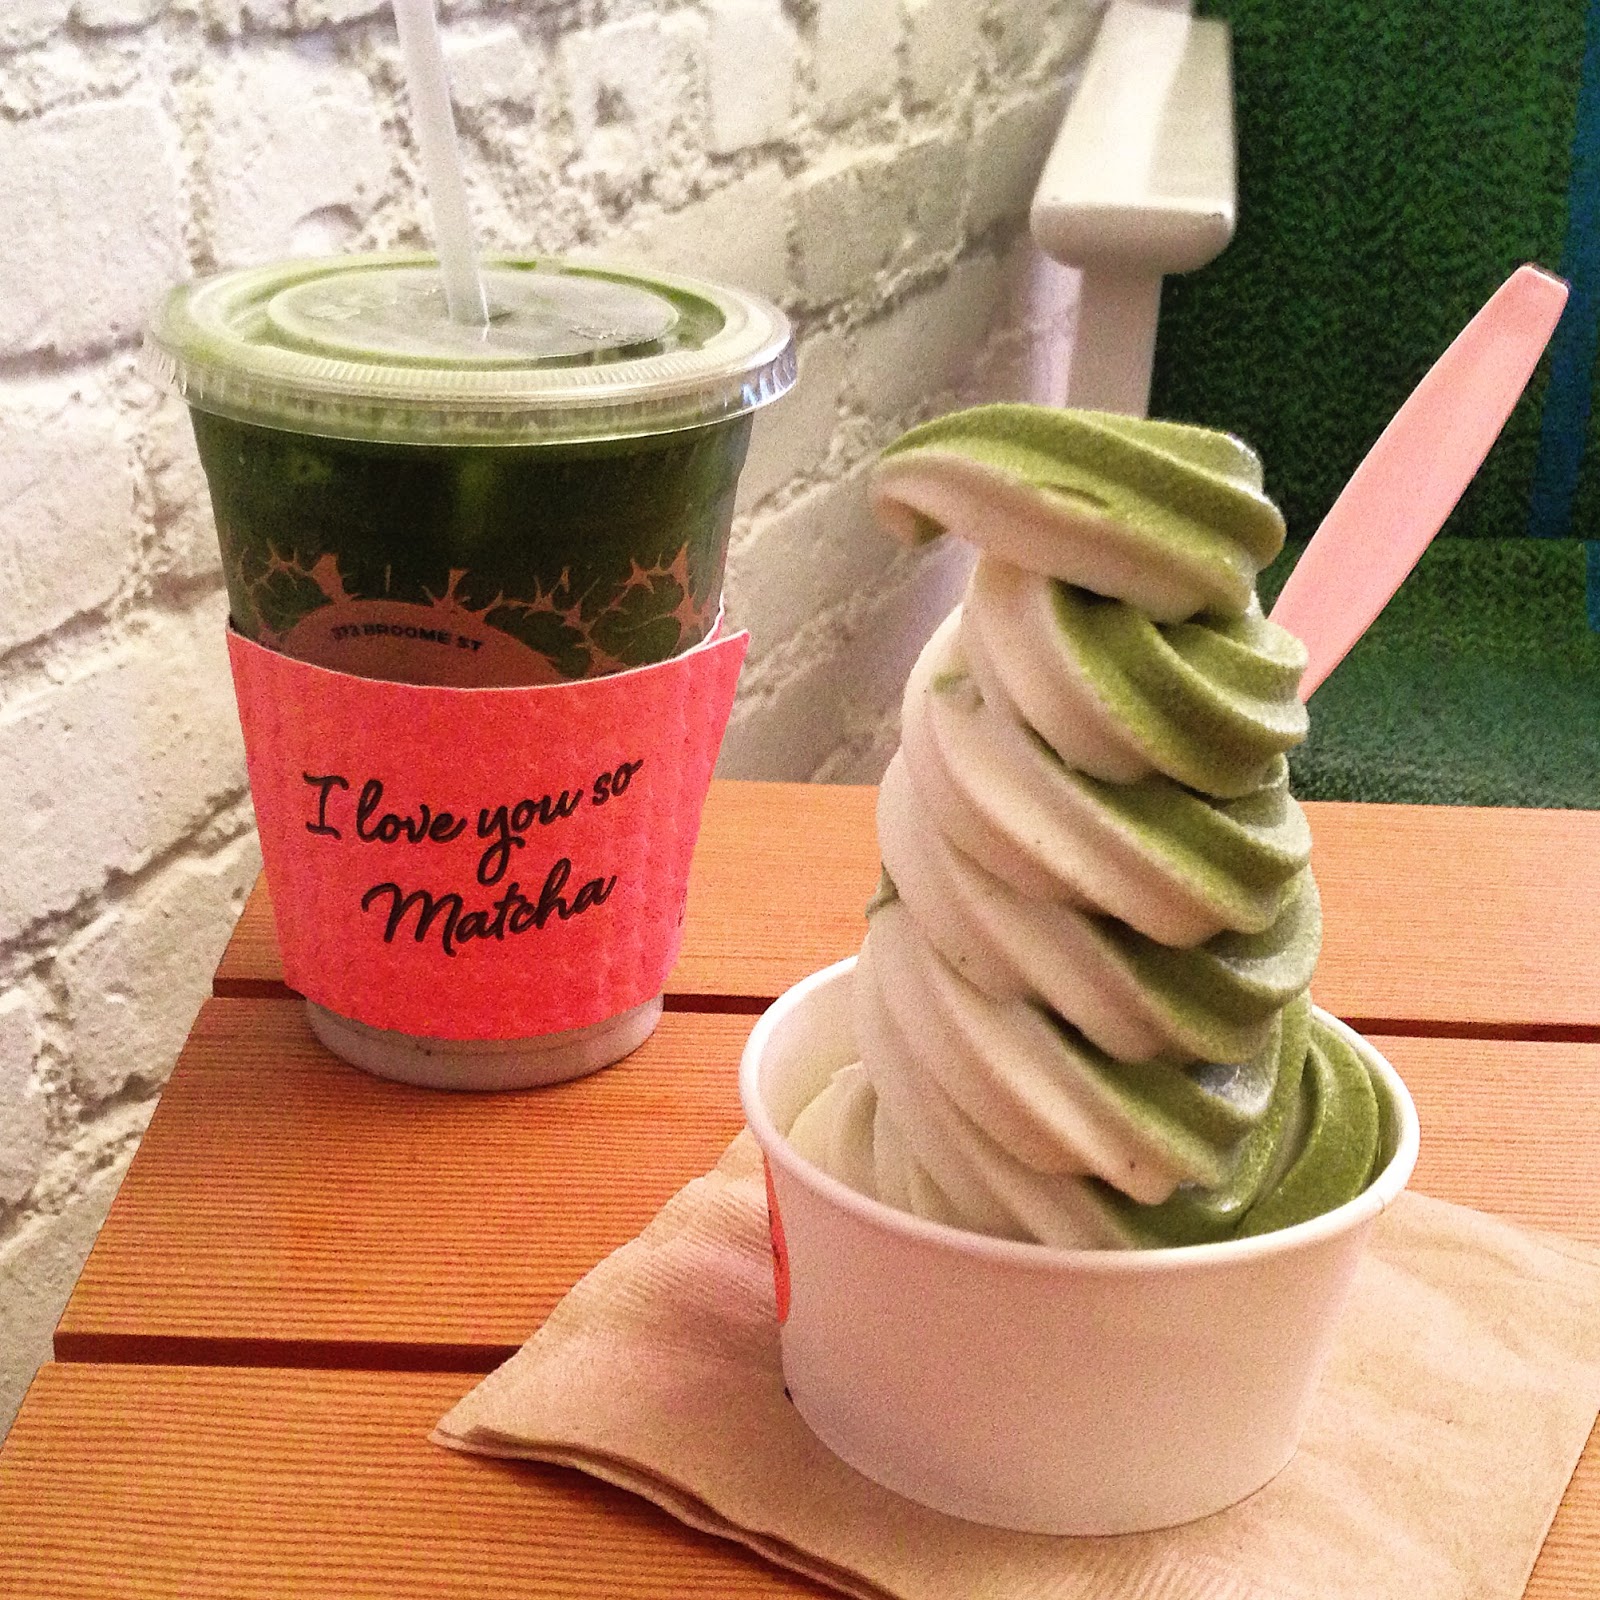
They offer hot and cold matcha drinks (not just lattes) and matcha pastries. But they also have matcha & vanilla soft serve ice cream and matcha & yuzu lemonade slushies! I definitely had a hard time deciding what to try, but I settled on an iced coconut matcha latte and a soft serve swirl.

The latte wasn't bad. Neither the matcha nor coconut flavors were overwhelming. Unlike a matcha latte at Starbucks, I liked that this wasn't sweet so you can control how much sweetener to add. At $5, I didn't find it overpriced in this day and age, even in NYC, for a 16 oz. cup. They didn't charge more for ordering it iced which I've seen some coffee shops do.

The matcha vanilla swirl was definitely my favorite of the two. I mean, it's ice cream. The vanilla was just a tad too sweet for my preference but the matcha flavor was just right. The matcha ice cream was smooth with good green tea flavor without any bitterness. I couldn't resist the swirl because it looks pretty, but I'd just get matcha ice cream next time. It's a really good sized serving at $4, especially with artisan ice cream shops charging more for a small single scoop.

Their name is fun. Their website says the name is derived from the Japanese word for tea, ocha. But I love their play on words to create a bright, fun tropical design concept as a nod to the cha cha dance's origin.

They go the extra effort to have custom cups and cup sleeves with their logo and design. I think this is a nice touch of detail that adds to the fun vibe. The "I love you so matcha" cup sleeve is just cute.

There are a good number of tables and seating inside. Plenty of outdoor bench seating with an expandable awning for sun shade.

Plus, they have a punch card to get a free drink after purchasing 9 drinks. Even the card design is cute!

They only accept credit cards and use Square's payment processing. If you have an email on file with Square and get digital receipts, Cha Cha Matcha's receipts also award stars for each visit and offers 50% off your next purchase after 5 purchases. So this is another bonus on top of the frequent buyer punch card.

I'd definitely go back when I'm in the area to try other items. And if they decide to open up another shop or two, I wouldn't mind as long as they can keep their local, neighborhood feel.

11.1.2016 UPDATE: I've been back to Cha Cha Matcha a few more times and still enjoying the vibe and products. While match soft serve is always available, they have been changing up the second flavor on offer. Pink lemonade was available this summer and fit perfectly with their color theme (check out my Instagram post), and they recently replaced it with coconut soft serve.

My Rating (out of 5):  4

Cha Cha Matcha
373 Broome St.
New York, NY 10013
chachamatcha.com

Monday, August 29, 2016

Golden Milk (Haldi Doodh) Recipe

I bought a few 3 oz. packages of spices, like turmeric, over in Curry Hill to try a (surprise) curry recipe. I don't use these spices often, so I have a lot left over. When I came across an email today with different ways to use turmeric, I was inspired to try a number of recipes.

I was introduced to golden milk (or haldi doodh), which is a warm turmeric milk drink. Turmeric has anti-inflammatory, anti-oxidant, and immune-boosting properties, among other benefits. So this drink is an easy way to take advantage of its health benefits. I also read that taking black pepper with turmeric increases absorption of turmeric in our bodies by 2000%.

I looked online for more information on how it's made and used this recipe to make my first cup. I really liked how it tasted with the warming spiciness of the turmeric and pepper. Turmeric is part of the ginger family and has a similar spiciness as ginger. Golden milk makes for a nice drink to have before bed. Note, I was cautious with my first cup and used a small amount of pepper. (Update: I made this again with a 1/2 teaspoon of black pepper that I saw in another recipe and thought it was too much so I'd stick with 1/4 teaspoon.)

I will definitely try different variations with other types of milk (coconut, almond), ginger, fresh turmeric vs. ground, and more pepper. But this is the recipe I used for my first try.

Golden Milk Recipe

Time: 2-3 minutes
Yield: 1 cup (8 oz.)

Ingredients
  • 1 cup milk (any fat content of your choice)
  • 3/4 teaspoon ground turmeric powder
  • 1/4 teaspoon ground black pepper
  • 1 teaspoon honey
  • 1 teaspoon coconut oil

Directions
Stir all ingredients in a pot over medium heat. Bring to a simmer and continue to simmer for 1-2 minutes. Keep an eye on it so it doesn't boil over. Pour into a mug and enjoy!

Optional: Some of the ground spices settle to the bottom of the mug, which I didn't mind. If you prefer, you can strain the mixture through a very fine sieve.

Saturday, August 20, 2016

Urbanspace Vanderbilt Review

Finally paid a visit to Urbanspace's indoor spot. The "food hall" term is a current food trend and, frankly, I roll my eyes because most self-proclaimed food halls are just food courts. I like food courts, so just call it what it really is.

So, I was very pleased to step inside Urbanspace Vanderbilt and actually feel like I was in a food hall. I didn't exactly have in mind what a food hall should look like, but I knew this is how a food hall should feel once I walked around this place.

(In contrast, on the way to Urbanspace Vanderbilt, I saw the new Great Northern Food Hall by chef Claus Meyer in Grand Central and was disappointed in its appearance. It looked like food kiosks or counters that I can find at airports and didn't conjure the feel of a food hall to me.)

The layout and design at Urbanspace Vanderbilt really make the vibe. There's open space between many vendors as opposed to partitions or walls separating each vendor at a typical food court. Even with the industrial decor, the string lights help bring warmth to the space. I just like how it all comes together. Sorry that I don't have any pictures of the space to share...my phone battery was dying.

There are plenty of great vendors to choose from like Roberta's, Sigmund's Pretzels, and OddFellows Ice Cream. And some food concepts will rotate giving more reason to return. On this first visit, I went with a small Famous Original pizza from Roberta's. Great thin, crispy crust but be prepared to wait 10-15 minutes because they make pizzas to order.


It's a great way to try a bunch of vendors in one place and it's year-round. Only wish it was conveniently located for me.

My Rating (out of 5):  4

Urbanspace Vanderbilt
Entrances at 45th St. & Vanderbilt Ave.
230 Park Ave. (at The Helmsley Building)
New York, NY 10169
http://urbanspacenyc.com/urbanspace-vanderbilt/

Sunday, July 31, 2016

Off the Eaten Trail: Kocostar Foot Therapy Review

WARNING: This post contains photos of peeling feet that you may find gross and wish to avoid.

I was late to the game on foot peels and wish I had heard of them sooner. With all the walking in NYC, my feet are cracked and rough unlike when I lived in suburbs. I've tried foot lotions that are intended for cracked, dry feet and filing rough skin. But they never really worked and thick, rough skin remained.

Kokostar Foot Therapy
So when I heard about foot peels, specifically Baby Foot, I was willing to try it. Unfortunately, the Ricky's location that I went to was out of Baby Foot. But a salesgirl suggested Foot Therapy by Kocostar and swore that it works just as well and only costs $9.50. (Baby Foot is around $25.)  I was skeptical that it could work as well given the significant price difference, but I was willing to try Foot Therapy just to see how a foot peel would work.

I also did some online research about foot peels and found Refinery29's tips to be very helpful. I soaked my feet once or twice after the peel, but not every day.

I did my foot peel in April this year. I highly recommend doing a foot peel as the weather starts to get warmer and a couple of weeks before you plan to wear shoes that expose your feet. Your entire foot will peel up to the ankle and it can be unappealing and embarrassing.

It didn't take very long after using Foot Therapy for my feet to get a good peel going by the fourth day. Nothing much happened for the first few days and I didn't soak my feet. But when I walked around the city in sneakers and socks, I was surprised at how much my feet had peeled when I took off my socks at home. I think the moisture and sweat really helped things get going.

From there, I soaked my feet a couple of times which helped along the peeling as well. What impressed me about the foot peel is how effective it is in shedding any hard, calloused skin around my heels and balls of my feet. Once the dead skin had shed, those areas felt soft and were not calloused or cracked anymore. It's amazing and Foot Therapy worked really well for me.

My feet stayed soft and smooth for a short while before I started to notice any roughness starting to occur. I wasn't surprised by this since it's just the normal process of what happens when walking around the city. But because foot peels are chemical peels, it's not something that should be used frequently. I think waiting at least 2-3 months between treatments is a good idea. (Note, I am not a doctor and this is just my opinion.)

Here are pictures of my experience. My feet weren't in as bad a shape as I saw in some other people's pictures. Personally, I don't think the pictures are that bad. The pictures are a teeny gross and unsightly, but they didn't make me feel sick or need to look away.

Bottom of my feet before I applied Foot Therapy:

Bottom of my feet right after soaking in Foot Therapy booties (not much noticeable change):

Once the peeling really began:

Flaking around the ankle

I want to try some other peels on Refinery29's "Best Foot Peels For Under $20" to see how effective they are, such as TONYMOLY Super Peeling Liquid. But I would use Foot Therapy again with no hesitation.

Bottom Line: Highly recommend

Friday, July 29, 2016

Off the Eaten Trail: Makeup Primer Substitute

Ok, so I'm veering off food posts with this one. I'm always interested in alternatives or substitutes for pricey products like makeup. But there are a lot of cheap or hokey suggestions out there and it's hard to know what really works.

One day, I saw a makeup artist's tip from a lifestyle talk show on using chafing gel as makeup primer because they have the same main ingredients. So I was very intrigued about using chafing gel as a low-cost primer substitute. I use Smashbox Photo Finish Foundation Primer but I don't use it everyday because I don't like a lot of steps in my makeup routine and it's expensive at $36 for 1 oz. (at time of this post). I love the silky and smooth feel of the primer, and I could see how it would work for chafing. But I would never waste expensive primer on my body! 

I haven't used chafing gel and a Google search primarily turned up two products. Other anti-chafing or anti-friction sticks and powders show up but aren't going to work as primer.

1. Lanacane Anti-Friction Gel, 1 oz. - may also be labeled as "Anti-Chafing Gel"; price range $5-8. Ingredients from Lanacane's Anti-Friction FAQ page: cyclopentasiloxane, dimethicone crosspolymer, dimethicone / vinyl dimethicone crosspolymer, zea mays (corn) starch.

2. MONISTAT COMPLETE CARE® Chafing Relief Powder Gel®, 1.5 oz. - price range $5-7. I didn't find ingredients easily on Monistat's site so here are the ingredients listed on Target.com:
Active Ingredient: Dimethicone (1.2%)
Inactive Ingredients: Cyclopentasiloxane, Dimethicone/Vinyl Dimethicone Crosspolymer, Silica, Tocopheryl Acetate, Trisiloxane.

Now, the Smashbox primer ingredients are: 
CYCLOPENTASILOXANE , DIMETHICONE , DIMETHICONE CROSSPOLYMER , TRISILOXANE , SILICA , DIMETHICONE/VINYL DIMETHICONE CROSSPOLYMER , ETHYLHEXYL SALICYLATE , RETINYL PALMITATE , TOCOPHERYL ACETATE , CARTHAMUS TINCTORIUS (SAFFLOWER) SEED EXTRACT , PROPYLENE GLYCOL , WATER\AQUA\EAU , VITIS VINIFERA (GRAPE) SEED EXTRACT , COLA ACUMINATA (KOLA) SEED EXTRACT , CAMELLIA OLEIFERA LEAF EXTRACT

After comparing the products, I'm actually inclined to try chafing gel as low-cost primer substitute. The Smashbox ingredients listed first are identical to the chafing gels. Both products are used on the skin, and at $5-8, I would have no problems using chafing gel for actual chafing. 

Now, the Smashbox primer does have other ingredients like a number of plant extracts, but they are listed at the end and I doubt the amounts are significant to justify a price that is 450% or more than chafing gel.

Once I've tried this substitute, I plan to update this post.